Hardwood Floor Refinishing Guide: Sand, Restore & Maintain
Hardwood floor refinishing is one of the most effective ways to restore the beauty of your home without replacing the entire floor. Whether your flooring looks dull, scratched, or worn out, sanding and refinishing can bring it back to life quickly and cost-effectively.
Why Choose Hardwood Floor Refinishing?
Hardwood flooring remains one of the most popular choices for homeowners due to its durability and timeless look. Instead of replacing damaged flooring, refinishing offers a smarter solution.
Key Benefits:
-
Cost-effective compared to full replacement
-
Restores original shine and texture
-
Improves indoor air quality (no dust-trapping fibers like carpet)
-
Long lifespan with proper maintenance
Refinish or Replace Hardwood Flooring?
Before starting, it's important to determine whether your hardwood floor needs refinishing or full replacement.
Simple Test:
Pour a small amount of water on the floor:
-
If water absorbs quickly → boards are damaged → replacement needed
-
If water sits briefly → refinishing is sufficient
Tools & Materials Needed
To properly sand and refinish hardwood flooring, prepare the following:
-
Drum sander
-
Edge sander
-
Sandpaper (multiple grits)
-
Hammer & nail punch
-
Vacuum cleaner
-
Dust masks
-
Plastic sheets (for protection)
Step-by-Step Hardwood Floor Sanding Process
Step 1 – Prepare the Room
Clear the space completely.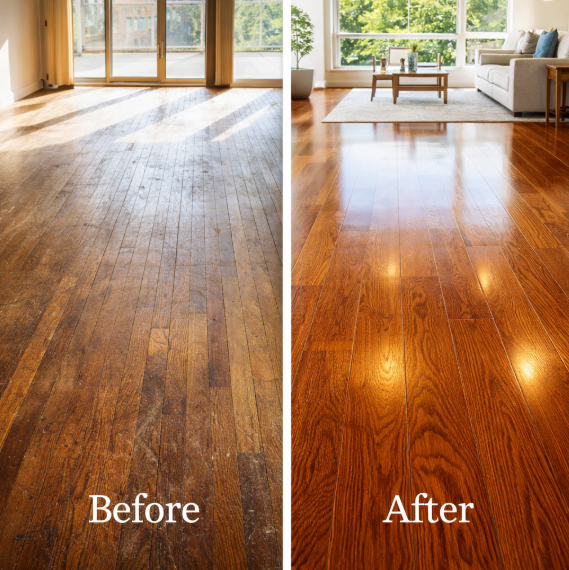
Cover vents, doors, and fixtures to control dust.
Step 2 – Secure Nails
Use a nail punch to push down protruding nails.
This prevents damage to sanding equipment.
Step 3 – Sand Edges & Corners
Use an edge sander for areas the drum sander cannot reach.
Ensure consistent sanding around the room perimeter.
Step 4 – Sand the Main Floor
Follow the direction of the wood grain.
Recommended sanding sequence:
-
First pass: 40–50 grit
-
Second pass: 60–70 grit
-
Final pass: 80–90 grit
Vacuum thoroughly after each sanding round.
Step 5 – Apply Finish
After sanding:
-
Apply stain, oil, or varnish
-
Use brush or roller along wood grain
-
Apply at least 2–3 coats for durability
Allow proper drying time before placing furniture.
Maintenance Tips After Refinishing
To keep your hardwood flooring looking new:
-
Vacuum regularly
-
Avoid excessive water when cleaning
-
Use protective pads under furniture
-
Clean weekly to prevent buildup
Common Mistakes to Avoid
-
Skipping nail preparation
-
Using incorrect sandpaper grit
-
Not sanding evenly
-
Applying finish too quickly
-
Poor dust control
Internal Linking Suggestions
You can link this page to:
-
Basement Renovation Ideas in Toronto
-
Home Renovation Timeline Guide
-
Flooring Installation Services Toronto
FAQ
Q1: How long does hardwood floor refinishing take?
Most projects take 2–5 days depending on floor size and drying time.
Q2: How often should hardwood floors be refinished?
Typically every 7–10 years, depending on wear and usage.
Summary
Hardwood floor refinishing is a practical way to upgrade your home without major renovation costs. With proper sanding techniques and finishing, you can restore both beauty and durability while extending the life of your flooring.
Get Professional Help
Not sure if your flooring needs refinishing or replacement?
Our experts can assess your space and recommend the best solution.
👉 Contact us today for a consultation.
📞 Phone: 905-597-8566
🌐 Website: https://www.renocompass.ca/